Thursday, April 30, 2009

How to make flv video auto loop (auto rewind) with ease

A lot of people may be confused on how to make a flash video auto loop on a web page when the flash video (FLV) reaches its last frame. For sometimes the “AutoRewind=true” has obviously been set in the OBJECT tag but the flash video (FLV) still does not automatically rewind. Sometimes even you have searched the Internet for a couple of hours, but still cannot get it done.

PureFormulas.com-Great Health, Pure Goodness, Highest-Grade Natural Supplements! Click here!

At this moment, you can do this if you alter the playback settings to use the Moyea web player rather than fooling around with the HTML code. Here is the steps to make flash videos auto rewind with tool.

Advertisement by Leawo Free Video Accelerator - Watch and download online videos in high speed without buffering:

Watch Hot Hollywood movies for free

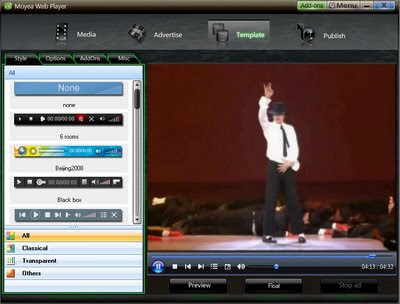
Step 1. Download Moyea web player, launch it in your PC. Moyea web player is a flash video player maker and quick solution for making a custom flash video player for your website, and it is free.

Step 2. Input flash videos into Moyea Web Player . This tool accepts video in a wide range of formats. If your video is not FLV, you can use the four converters that recommended in Encoder tab to convert the video file to FLV or MP4, MOV, 3GP, 3G2 with H.264 codec that can be supported by Adobe Flash Player.

Step 3. Configure the skin of the flash video player. (Optional)


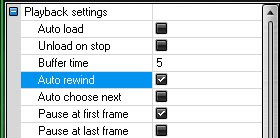
Step 4. Click “Template” menu>>Options>>Playback settings, here check “Auto rewind”, and this will make your flash video auto loop on web page.


Step 5: Click "Publish" button to generate a web FLV player and other related files (Note: if you want to get a separate playlist file, please check "Out File")

Step 6:
Upload all the published files except the index.html file, to the same folder of your web server.

Step 7: Embed the generated player in your webpage with the embed code below(Add JavaScript in blogger (blogspot) post):
<script type="text/javascript" src="swfobject.js"></script>
<div id="flashcontent">Player will show here</div>
<script type="text/javascript">
var so = new SWFObject('mwplayer.swf','player','500','450','9');
so.addParam('wmode','opaque');
so.addParam('quality','high');
so.addParam('allowfullscreen','true');
so.addParam('allowscriptaccess','always');
so.write("flashcontent");
</script>


Note: 1. mwplayer.swf is the actual flash video player. If it resides in another directory, then point to it with a relative path (e.g. video/mwplayer.swf) or an absolute path (e.g. http://www.yourdomain.com/video/mwplayer.swf ).


Other tool: Leawo Free YouTube Downloader - Download YouTube videos and other web videos with ease

Stumble Upon Toolbar

Tuesday, April 28, 2009

Flash OBJECT and EMBED tag (2)

Part 1 "General introduction to the two tags" is here.

2. Why do we use all the tags above? Is there any tag that can be left out?

OBJECT tag is used for IE 3.0 on Windows & later version of IE and other web browsers that supports ActiveX component. Value of attribute “classid” and “codebase” must be accurate the same as the example code above. These two attributes tell web browsers the download URL address of Adobe Flash Player automatically. If you haven’t installed Adobe Flash Player, IE 3.0 and later version of IE will pop up a dialog box that asks if you want to install Adobe Flash Player automatically. If you don’t want to enable the users that haven’t installed Adobe Flash Player to automatically install it, you can leave out these two attributes.

Embed tag is used for Netscape Navigator2.0 and later version and other web browsers that supports Netscape plug-ins technique. Attribute “PLUGINSPAGE” indicates the download address of Adobe Flash Player to web browser. If Internet users haven’t installed Adobe Flash player, after the installation, they have to reboot their web browsers.

To ensure displaying Flash correctly on most web browsers, you have to nest the EMBED tag in the OBJECT tag, just like the example code above. Web browsers supports ActiveX component will automatically ignore the EMBED tag nested in the OBJECT tag. Netscape browser and Netscape plug-in supported browsers will only read EMBED tag neglected OBJECT tag. i.e. if you leave out the EMBED tag, Firefox will not identify your Flash file. (For a wonder, if OBJECT tag is left out but only with EMBED tag, IE also can display Flash correctly LOL. More discussion on this issue will be continued)

Required and optional attributes of OBEJCT tag and EMBED tag for publishing videos to the Internet are as follow:

(1). Required attributes

•CLASSID - Used to set the ActiveX component. It is only used in OBJECT tag.
•CODEBASE - Used to indicates the URL of the ActiveX component, so if the ActiveX component is not installed in web browser, it will automatically download it. It is only used in OBJECT tag.
•WIDTH - Indicates the width of the video with percentage or pixel.
•HEIGHT - Indicates the height of the video with percentage or pixel.
•SRC - Indicates the URL of the video (relative or absolute path). For EMBED tag only.
•PLUGINSPAGE - Used to indicates the location of plug-in Adobe Flash Player, so if this plug-in is not installed, it enables the page automatically install it. For EMBED tag only.
•MOVIE - Indicates the location of the video. For OBJECT tag only.

(2). Optional attributes and their available value

•ID - Identifies the reference name of the flash movie, so that it can be referenced by scripting language such as JavaScript or VBScript. (attribute for OBJECT tag only)
•NAME - Identifies the reference name of the flash movie, so that it can be referenced by scripting language. (attribute for EMBED tag only)
•SWLIVECONNECT - (true or false) Specifies whether the web browser should start Java when loading the Adobe Flash Player for the first time. The default value is false if this attribute is omitted. If you use JavaScript and Flash on the same web page, Java must use FSCommand to work.
•PLAY - (true or false) The default value is true if this attribute is omitted. Specifies whether the flash movie should plays automatically while loading in the web browser.
•LOOP - (true or false) Specifies whether the flash video should replay or stops when it comes to the last frame.
•MENU - (true or false)

  • true - display the full menu, allowing the Internet users a wide range of options to zoom, enhance, etc.
  • false - display the menu that contains only the Settings option and About Flash option.
•QUALITY - (low, high, autolow, autohigh, best)

  • low - prefers playback speed other than appearance and never uses anti-aliasing.
  • high - prefers appearance other than playback speed and always uses anti-aliasing. If the movie does not contain animation, bitmaps are smoothed; if the movie has animation, bitmaps are not smoothed.
  • autolow - emphasizes playback speed at first but improves appearance whenever possible. Playback begins with anti-aliasing turned off. If the Flash Player detects that the processor can handle it, anti-aliasing is turned on.
  • autohigh - emphasizes playback speed and appearance equally at first but sacrifices appearance for playback speed if necessary. Playback begins with anti-aliasing turned on. If the actual frame rate drops below the specified frame rate, anti-aliasing is turned off to improve playback speed. Use this setting to emulate the View > Antialias setting in Flash.
  • best - provides the best display quality and does not consider playback speed. All output is anti-aliased and all bitmaps are smoothed.
•SCALE - (showall, noborder, exactfit)

  • showall - default value. Maintaining the original aspect ratio of the movie so that the entire flash video can be visible in the specified area without distortion. Blank may appear on two sides of the video.
  • noborder - Maintaining the original aspect ratio of the movie, but the flash video may possibly with some cropping without distortion while the video is scaled to fill the specified area.
  • exactfit - makes the entire movie visible in the specified area without trying to preserve the original aspect ratio. Distortion may occur.
•ALIGN - (l, t, r, b)

  • l, r, t, and b - align the movie along the left, right, top or bottom edge, respectively, of the browser window and crop the remaining three sides as needed.
  • tl and tr - align the movie to the top left and top right corner, respectively, of the browser window and crop the bottom and remaining right or left side as needed.
  • bl and br - align the movie to the bottom left and bottom right corner, respectively, of the browser window and crop the top and remaining right or left side as needed.
•WMODE - Possible values: window, opaque, transparent. Sets the Window Mode property of the Flash movie for transparency, layering, and positioning in the browser.

  • window - movie plays in its own rectangular window on a web page.
  • opaque - the movie hides everything on the page behind it.
  • transparent - the background of the HTML page shows through all transparent portions of the movie, this may slow animation performance.
•BGCOLOR - [ hexadecimal RGB value] in the format #RRGGBB . Specifies the background color of the movie. Use this attribute to override the background color setting specified in the Flash file. This attribute does not affect the background color of the HTML page.
•BASE - . or [base directory] or [URL]. Specifies the base directory or URL used to resolve all relative path statements in the Flash Player movie. This attribute is helpful when your Flash Player movies are kept in a different directory from your other files.
•FLASHVARS - Possible values: variable to pass to Flash Player. Requires Macromedia Flash Player 6 or later.

  • Used to send root level variables to the movie. The format of the string is a set of name=value combinations separated by '&'.
  • Browsers will support string sizes of up to 64KB (65535 bytes) in length.
  • For more information on FlashVars, please refer to "Using FlashVars to pass variables to a SWF" (TechNote tn_16417).

Related tutorials
How to add flash videos to website?
How to make a flash video player for your website to control the playback of FLV files
Stumble Upon Toolbar

Thursday, April 23, 2009

Flash OBJECT and EMBED tag (1)

Everyone know that Flash is the best bet if you want to embed video to web page, or rather FLV, for Flash works cross browsers and cross platform.
Inserting a Flash (SWF, FLV) file into HTML web page is already an old and familiar thing to all of us. It is a rather non-flexible thing that just to edit some options in the template. However, I did not understand some parameters totally in the HTML tag. These days when I was surfing the Internet I have found some comprehensive introduction to these two tags. I read it and conclude it with my own words; I think it will be useful to us, so I wrote this article.
This article includes two parts:
1. General introduction to the two tags.
2. Why do we use all the tags above? Is there any tag that can be left out?

1. General introduction to the two tags.
To display Flash correctly on web page, HTML tags which indicate the path of the Flash file is needed in the web page. These HTML tags are OBJECT tag and EMBED tag. OBJECT tag is used for IE on Windows, while EMBED tag is for Netscape Navigator on Windows and Macintosh and IE on Macintosh. IE on Windows play Flash with ActiveX component while other web browsers play Flash with Netscape plug-in technique. The code below is an example used to embed Flash file to web page.
Example HTML Code:
<object classid="clasid:D27CDB6E-AE6D-11cf-96B8-444553540000" codebase="http://download.macromedia.com/pub/shockwave/cabs/flash/swflash.cab#version=7,0,19,0"
width="432" height="330" id="myMovieName" >
<param name="movie" value="myMovieName.swf" />
<param name="quality" value="high" />
<param name="bgcolor" value="#FFFFFF">
<embed src="myMovieName.swf" quality="high" bgcolor="#FFFFFF" width="432" height="330" name="myMovieName" align="" type="application/x-shockwave-flash" pluginspace="http://www.macromedia.com/go/getflashplayer">
</embed>
</object>

Note that myMovieName.swf is the actual flash video player. If it resides in another directory, then point to it with a relative path (e.g. video/myMovieName.swf) or an absolute path (e.g. http://www.yourdomain.com/video/myMovieName.swf ).

Part 2 "Why do we use all the tags above? Is there any tag that can be left out?"

Related article
How to add flash videos to website
Customize a web FLV Player in the easiest way

Stumble Upon Toolbar

Monday, April 20, 2009

Customize a web FLV Player in the easiest way

Maybe people think it's very difficult to realize playing videos on their own website, blog, forum or e-store, because it's difficult for them who don't know any coding knowledge to customize an own-branded web player like YouTube player for web to play videos. So if they want to play videos on their own website, they have to compress their videos size to 10 mins or smaller and upload them to YouTube, and then get the embed codes of the videos for embedding onto website. Although they know the drawbacks like the videos will belong to YouTube, the video quality will be lower, etc.

In fact, it's not difficult to customize a skinning web player any more. Here, I will introduce a way to customize a skinning web player with full-screen capability and playlist. The web player is a
flash video player (FLV player), and it is free. At present, this way is the easiest one, which only needs a few mouse clicks.

Advertisement by Leawo Free Video Accelerator - Watch and download online videos in high speed without buffering:

Watch Hot Hollywood movies for free

Step 1: Open Moyea Web Player(Moyea Web Player is a graphical program for customizing
web FLV player like YouTube player with scrollable thumbnail playlist)


Step 2: Input flash videos into Moyea Web Player (If your videos are not flash videos, please convert them to...)

Step 3: Configure the skin of the flash video player


Step 4: Click "Publish" button to generate a web FLV player and other related files (Note: if you want to get a separate playlist file, please check "Out File")


Published files

Step 5: Upload all the published files except the index.html file, to the same folder of your web server.

Step 6: Embed the generated player in your webpage with the embed code below(
Add JavaScript in blogger (blogspot) post):
<script type="text/javascript" src="swfobject.js"></script>
<div id="flashcontent">Player will show here</div>
<script type="text/javascript">
var so = new SWFObject('mwplayer.swf','player','500','450','9');
so.addParam('wmode','opaque');
so.addParam('quality','high');
so.addParam('allowfullscreen','true');
so.addParam('allowscriptaccess','always');
so.write("flashcontent");
</script>

Note: 1. mwplayer.swf is the actual flash video player. If it resides in another directory, then point to it with a relative path (e.g. video/mwplayer.swf) or an absolute path (e.g. http://www.yourdomain.com/video/mwplayer.swf ).

Step 7: The
FLV player will appear on your website.

Source: playdiy.com

Stumble Upon Toolbar

Thursday, April 9, 2009

How to make a flash video player with advertisements / ads (add ads to flash video)

At the present time, there are a lot of kinds of online advertisements (ads). Classified by the way of delivery, online ads can mainly be three forms: online text ads, online image ads and online Flash ads.

With the high speed development of Internet and the widely use of ADSL (broad band), Internet users are not satisfied by just reading text or image on the Internet any more. Demand for rich media services such as video on demand, digital television and voice over IP grows more clamorous every day. With streaming video, the Internet user does not have to wait to download a video to play it. Instead, the video is sent in a continuous stream of data and is played as it arrives.

Advertisement by Leawo Free Video Accelerator - Watch and download online videos in high speed without buffering:

Watch Hot Hollywood movies for free

Nowadays, advertiser can post the advertisements which were posted on TV media to the Internet, replacing the traditional text, image and Flash ads with strong visual impulse and richer content with the form of video, to propagate the image of the enterprise and make advertisements for the products.

So, are you ready to post your own online video ads to the Internet? Are you searching for a tutorial explaining how to insert ads in a custom built flash video player? If so, you can use this software – Moyea Web Player, it is a quick and easy solution to add ads in any forms to videos, publish videos to web pages and generate a custom flash video player for website, and it is free.
This guide is going to show you how to easily add ads to your videos with this software and publish them to the Internet.

Step 1. Launch the program.
Launch Moyea Web Player on your PC, and import your videos to the program. (If your videos are not FLV, please convert them to…)

Step 2. Add advertisements to your videos in any forms at any point-in-time.
Click" Advertise" in the menu bar, you will get a window like this:

Firstly, you can select the video by choose from videos list or click the thumbnail picture from player profile, just as the picture above shows.

Secondly, Click "Add", a box will cascaded for you to add advertisements. The window will be like this:

On the box pop-up, via choose file type->set file path->confirm the advertisement position->set the duration of advertisement, you can add any advertisement to the video you have selected at any point-in-time.

If you want to delete the advertisement you have added, just select the one and click" Delete"; If you want to change the information of any advertisement you have added, just click it on "Advertisements list", then the box containing all the Ad's settings will appear, you can change the information in the box directly.

If you want to apply all of your Ads which have been set to all other video files, just click" Apply to all videos".

Terms (The interpretations of some terms on the interface)

File type: Here you should set Ad's file type firstly. Now three kinds of advertisement file can be added to videos: Flash video, Swf and Image.

File Path: Click, the box below will pop up, input the Ad's URL address or specify the local file path from your computer, click "OK", the advertisement can be inserted successfully.


Caption: Name of the advertisement that have been inserted. After have successfully input the file path, the advertisement's name will display automatically. Of course, you can rename it easily.

Advertisement position: The point-in-time on which the advertisement be inserted. You can set it as begin, mid and end, then the Ad will be inserted at the specific point-in-time respectively; If you choose "Current", you need to input the time in format of 00:00:00:000 to confirm the point-in-time.

Duration: Here you can set the duration of advertisement. Input the duration in format of 00:00:00:000. If the Ad's file type is Swf or Image, whose duration can't be gotten by program, you can click" Menu->Tools->Options" to get the box below for setting default duration:


Navigation on click: Specify the video link, with which the content linked will be opened when you click on the screen.

Click target: Specify the target window to show the linked content when user clicks on the video with link.

_self: show in the current window

_blank: show in a new window

_top: show in the top window

_parent: show in the parent window

Default value is _blank.

Fade in/out: If checked this, the advertisement will appear and disappear in slow motion.

Advertisements list: Advertisements' caption, position and duration will be displayed here. You can add as many Ads as you like to the video, but in trial version, no more than two Ads are allowed to be added.

Step 3. Publish the flash videos with ads and the custom swf flash vidoo player to the Internet.
Once all the necessary settings completed, you can click "Publish" button to publish a flash video player .

For more information you can check its user tutorial - http://www.flash-video-mx.com/web-player-pro/tutorial/

Related tutorials -
How to add flash videos to website?
Customize a web FLV Player in the easiest way

Stumble Upon Toolbar

Wednesday, April 1, 2009

Three ways to convert popular video to FLV

This tutorial will talk about three ordinary ways to convert popular video to FLV.
Which kind of website is the hottest nowadays in Web 2.0? Of course it is the video sharing website, such as Youtube, Google Video, Yahoo! video...The content of this kind of websites is of all kinds of things, but the same thing of these websites is that they all use Flash as their video media format, or rather FLV.

FLV is a brand new streaming video format. It makes use of the widely used platform on the Internet - Adobe Flash Player, and incorporate video into the Flash animation. FLV enables your videos can be viewable to 98% of all Internet users and bring great convenience to the broadcasting of Internet video.

To add FLV to web pages, you need to convert your video to FLV. Now I introduce three ways to convert video to FLV.

1. Moyea Video4Web Converter
This Video4Web Converter is a Freeware and professional tool to convert all popular video to flv, video to mov, mp4, 3gp and 3g2. It can change the values of the video for brightness, contrast, and volume. You may also trim and crop the video to fit your particular requirement.


2. Macromedia Flash 8 Video Encoder
Starting with Macromedia Flash MX 2004, it had already supported FLV decoding, but I suggest you use the latest version Flash 8. This version has an independent FLV conversion tool: Flash 8 Video Encoder. This encoder also provides a lot of video settings to meet your need.

3. Online converter
This method is famous to a lot of Internet users. You can convert your videos from your computer hard disk, or from online videos using different protocols (http, ftp, rtmp...) to FLV with the online converter.
But this method is not recommended to convert video, especially for some important video files. For there are several reasons:
Reason 1: It will take more time to convert videos compared with some desktop converters.
Reason 2: It requires that you are in a good internet connection. If the connection speed is slow, the convertion will be very slow or just stop.
Reason 3: The quality of the resulting video is not ensured, various problem is possible, such as audio and video is not synchronized, or only the audio is converted by not does the video...

Related tutorial -
Convert video to FLV for free (free video to FLV converter)
How to add flash videos to website?
How to make a flash video player for your website to control the playback of FLV files
Stumble Upon Toolbar